Hello, friends! Today we will talk about how to upload files to a dedicated server, hosting or vps in the simplest way.
We will use dedicated software. FileZilla is the best-known, most convenient and free FTP client. Uploading files and folders with it is quick and easy. First of all, you need to find and download it. This is easy to do through the Google or Yandex search engine.
Uploading files to the server - step by step
After installing FileZilla, launch it.
Open the "Site Manager" (shown in the picture below).

The site manager opens. Next, click the "New Site" button and give it a name, for example letter. In the "Host" field, enter your server's IP address for your FTP connection.
You can find this IP in the email your hosting provider sends you after you order and pay for the server. You can also log in to the client area of the site where you rent the server. Your IP will be there too. Copy it and paste it into the "Host" field.
The "Protocol", "Encryption" and "Logon Type" fields should be set as shown in the next picture.
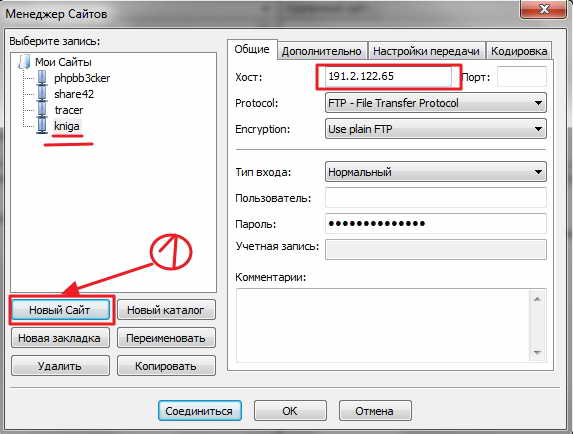
Now enter the username and password you use — they were also sent to your email. Finally, click the "Connect" button. You will be given ftp access.
First, in the right-hand pane, find the folder you want to upload files to. If necessary, right-click and choose "Create directory" and give it a name.
In the left-hand panes, select the files to drag into the right-hand pane, or simply click the "Upload" button. You can also download files the other way — from the server to your home computer.
The pane at the very bottom shows the names of the files you worked with last. Using the buttons below this pane, you can see:
- queued files — files waiting to be uploaded;
- failed transfers — files that could not be uploaded for some reason;
- successful transfers — files that were successfully uploaded to your server.
That is all you need to know. With this program, uploading is quick and convenient.